Ham and Cheese Roll Ups

This is a sponsored conversation written by me on behalf of Smithfield®. The opinions and text are all mine.
Get your party started with these tasty Ham and Cheese Roll Ups! Perfectly poppable for any occasion, but also great for an easy lunch idea!

Nothing beats these Ham and Cheese Roll Ups when I’m feeling snacky. Make them ahead of time for a tasty party appetizer for girl’s night or to serve up with our favorite slider recipes while watching the football game.
I even keep some on hand for a quick lunch option for the kids. My boys always clean their plates when I serve these roll ups. They’re a fun way to change up lunchtime when we’re burnt out on regular old sandwiches.
If you’re making these ham & cheese roll ups for a crowd, just be sure to plan on a few disappearing from the fridge before the party starts. They’re hard to resist!
LOVE THIS RECIPE? PIN IT FOR LATER!
Follow Bread Booze Bacon on Pinterest
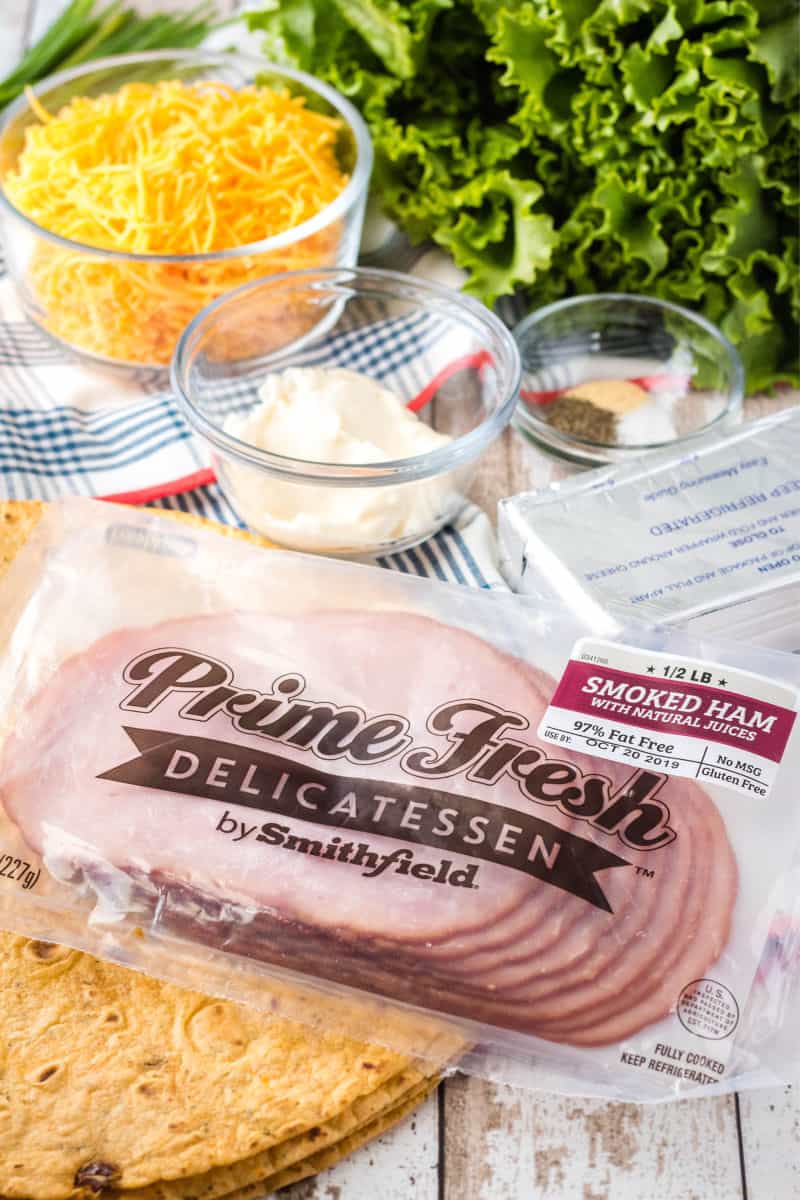
The secret to really great roll ups is great ingredients. This recipe is so simple, you just need a nice sharp cheddar, fresh chives, tasty wraps, and yummy deli meat like Smithfield® Prime Fresh™ Delicatessen Smoked Ham.
I remember when I first saw Smithfield Prime Fresh in the lunch meat case at our local Albertsons. I got all excited to try it because I’m a diehard Smithfield consumer. I’ve been buying their pork products for years – ham, pork chops, ribs, bacon – and now deli-style lunch meat! This is some seriously high-quality lunch meat, and I didn’t have to wait in line at the deli for it. Winning!
We started with the honey ham, because it’s an easy win at my house, and oh my gosh you guys. It was so freaking good! No super thin slices of meat here. These slices are nice and thick and they’re easy to pull apart. I hate when lunch meat slices stick together and tear.
Now we’re branched out into the smoked ham, roast beef, and oven roasted turkey breast too. Let’s just say my club sandwiches are pretty awesome thanks to Smithfield.
Ingredients for Ham Roll Ups
- Cream Cheese
- Cheddar Cheese
- Mayonnaise
- Chives or Green Onion
- Dijon Mustard
- Salt & Pepper
- Garlic Powder
- Burrito-Sized Wraps or Tortillas (I used sun-dried tomato basil wraps)
- Prime Fresh Delicatessen by Smithfield Smoked Ham
- Green Leaf Lettuce
If you like your roll ups on the meaty side, you’ll want to pick up two packages of ham. I did a couple of these wraps with 3 slices of ham and a couple with 2 slices. Both were tasty, but my boys liked to meatier ones for sure.
As pictured below, lay the first two ham slices down as directed, then cut the third ham slice in half and place on top side by side. You want to have lots of smoked ham in all the bites. Then proceed as directed.
*The nutrition facts for this recipe will vary based on the wrap you use, how much ham you add, and if you go with low-fat cream cheese or spinach instead of lettuce.
One of my favorite things about making ham & cream cheese roll ups is how pretty they look. All those colors look great on a buffet when we have friends over to watch football. Sure, you could leave out the lettuce and use regular flour tortillas, but have some fun with your food!
How to Make Ham Roll Ups
-
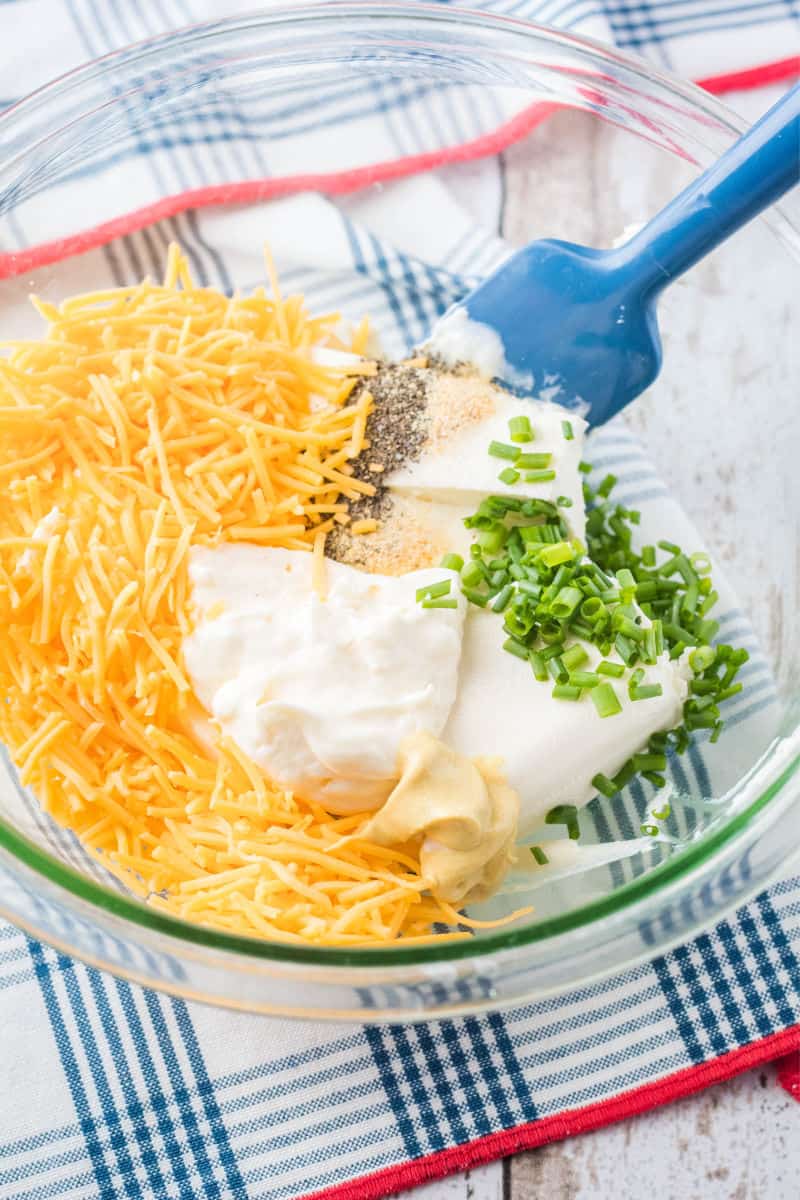
In a medium mixing bowl, stir together cream cheese, cheddar cheese, mayo, chives, Dijon, salt, pepper, and garlic powder until smooth. Make sure everything is thoroughly combined. You don’t want little pockets of chives or seasonings floating around.
-
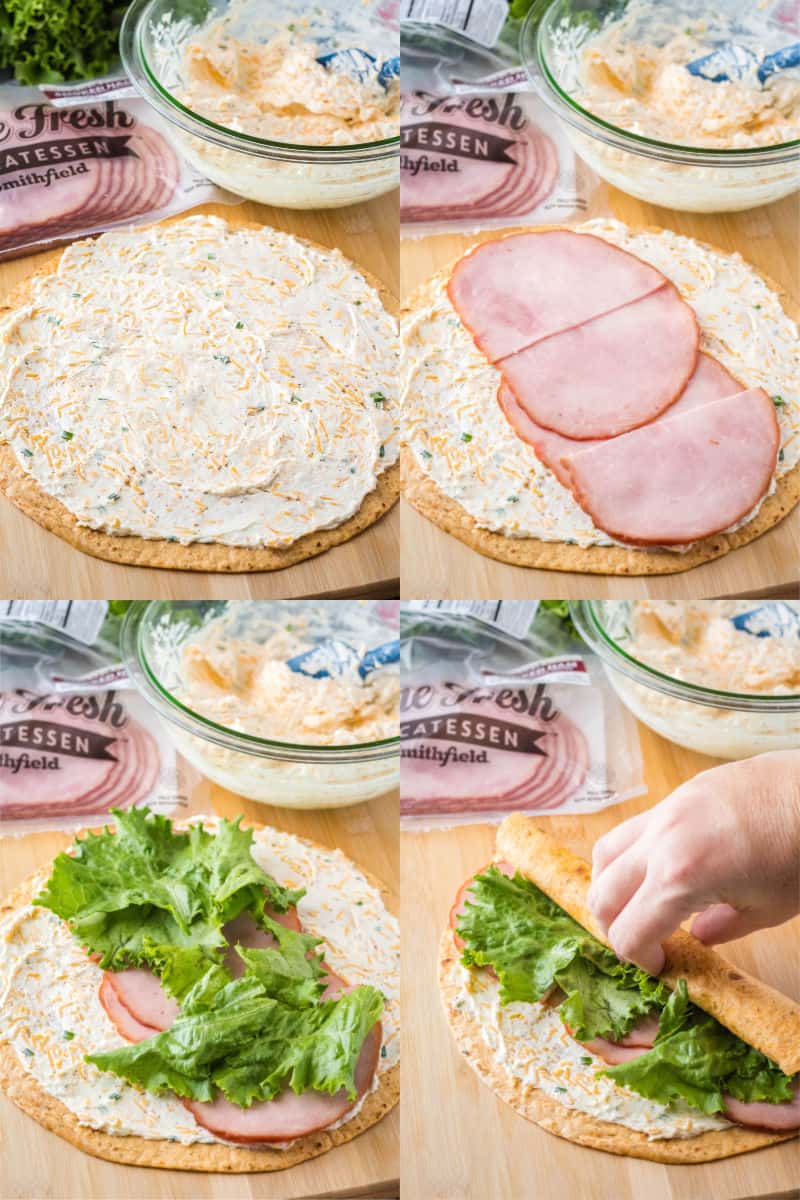
Place one wrap down on a cutting board (or flat surface). Place 1/4 of the cheese mixture on the wrap and spread out evenly over the whole thing, edge to edge. The cheese mixture will get the wraps to stick together and close.
-
Place 2 slices of Smithfield Prime Fresh Smoked Ham on the cheese mixture. The slices should be centered with the straight edges touching in the center of the wrap. Don’t worry if the edge of the ham doesn’t reach the outside edges of the wrap, we’re cutting them off later anyway. There should be a wide strip of the cheese mixture showing on each side of the ham (as pictured below).
-
Add a layer of lettuce over the ham slices and roll (rolling tips in the next step). Add as much or as little as you like. Fresh spinach would also be great here too.
-
Starting on one of the cheese edges of the wrap, roll the wrap into a log shape. Keep it snug, but not too tight or the wrap will tear. Use your thumbs to guide the rolling and your fingers to keep the lettuce and ham from pushing out toward the outer edge of the roll. The cream cheese on the opposite end of the wrap will glue it closed so you want it to be exposed when you finish rolling up the wrap.
-
Place the wrap, seam side down on a plate. Repeat with the other 3 wraps and remaining ingredients. Refrigerate for 30 minutes to 1 hour to let the cream cheese set up. (This makes them easier to cut!)
-
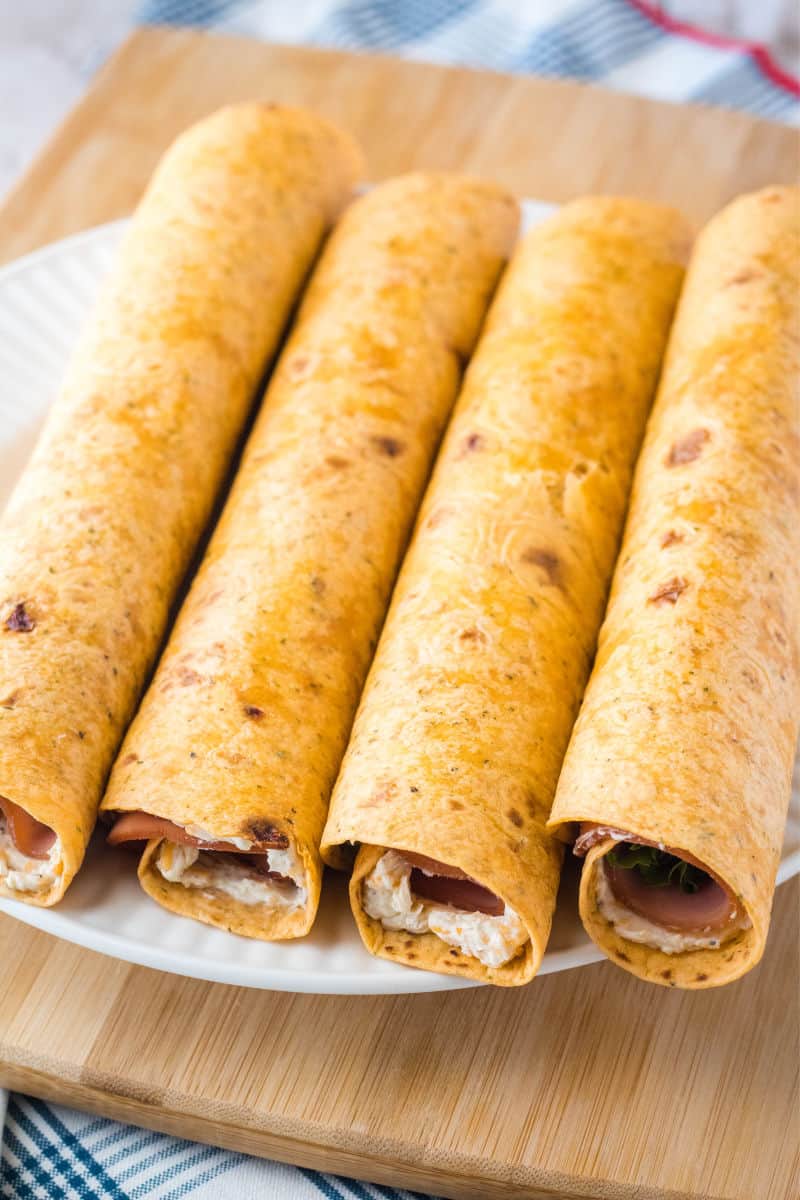
Take the roll ups out of the fridge and put them on a cutting board. Use a sharp knife to cut off the edges to where the filling starts. You want the full pinwheel effect showing on your slices. Then cut each roll into 8 bite-size slices.
-
Place roll ups on a platter. Serve immediately, or cover with plastic wrap and refrigerate until ready to serve.
Those end pieces? They are a snack for you. You deserve a reward for all the making these roll ups!
Or use them to fend off hungry family members who are staring at the plate as though they haven’t eaten in a week. Either way. 😉
How do you roll tortilla pinwheels?
It’s so quick and easy! Start with one end of the wrap. There should be some sauce of cheese filling to help the tortilla stick to itself and the filling. Roll up toward the opposite end like you’re making a log.
I use my thumbs to push the roll and my fingers to help keep the filling from squishing out as your roll. You want some of the sauce/cheese filling showing when you’re done rolling to help “glue” the end of the wrap down. That’s it!
Can you make tortilla roll ups the night before?
- You sure can! Wrap each “log” in plastic wrap and twist the ends and tuck them under the log to seal. This will keep them from drying out in the fridge. When you’re ready to serve, unwrap and slice.
Are you ready to lick your screen yet? Okay, maybe don’t do that. Buy, you should definitely head out to Albertsons, get yourself some of this awesome Smithfield Prime Fresh lunch meat, and make this ham roll ups recipe!

Crazy good recipes with ham!
- Brown Sugar Bourbon Ham
- Hawaiian Fried Rice
- Ham & Turkey Club Sliders
- Ham Salad
- Chicken Breast Supreme
More bites to make your mouth water!
- Buffalo Chicken Dip
- Swedish Meatballs
- Hawaiian Pizza Sliders
- Crock Pot Spinach & Bacon Queso Dip
- Deviled Eggs
- More appetizer recipes…

Ham and Cheese Roll Ups
Ingredients
Instructions
- In a medium mixing bowl, stir together cream cheese, cheddar cheese, mayo, chives, Dijon, salt, pepper, and garlic powder until smooth. Make sure everything is thoroughly combined.
- Place one wrap down on a cutting board (or flat surface). Place 1/4 of the cheese mixture on the wrap and spread out evenly over the whole thing, edge to edge.
- Place 2 slices of Smithfield Prime Fresh Smoked Ham on the cheese mixture. The slices should be centered with the straight edges touching in the center of the wrap. Don't worry if the ham doesn't each the outside edges of the wrap, we're cutting them off later anyway.
- Add a layer of lettuce over the ham slices. There should still be some of the cheese mixture showing on either side of the ham once you're done.
- Starting on one of the cheese edges of the wrap, roll the wrap into a log shape. Keep it snug, but not too tight or the wrap will tear. Use your thumbs to guide the rolling and your fingers to keep the lettuce and ham from pushing out toward the outer edge of the roll. The cream cheese on the opposite end of the wrap will glue it closed.
- Place the wrap, seam side down on a plate. Repeat with the other 3 wraps and remaining ingredients. Refrigerate for 30 minutes to 1 hour.
- Take the roll ups out of the fridge and put them on a cutting board. Use a sharp knife to cut off the edges. Then cut the wraps into 8 slices. Place roll ups on a platter. Serve immediately, or cover with plastic wrap and refrigerate until ready to serve.
Notes
- I used sun-dried tomato basil wraps for these roll ups. Spinach wraps and flour tortillas work great too.
- Nutrition is based off sun-dried tomato basil wraps.
This dish looks super delicious! I am definitely going to make this!
I made these for a family potluck and they were a big crowd pleaser! I added a little bit more Mayo after the original mix bc it seemed a little bit too stiff and dry to spread. Seasonings we’re perfect for feeding a big group, everyone loved it!