


Making Angel Food Cake from scratch is easier than you think. This recipe comes out perfectly fluffy every time! The hardest part is waiting for it to cool!

My husband Mike gets these cravings. His sweet tooth is incurable some days. Nine times out of ten when he asks me to bake something to give him a fix, he wants angel food cake with frosting. It’s his weakness and our kids are lucky he loves them enough to share.
Growing up Mike’s dad would request angel food cake frequently. He would always have Mike’s mom slather the cake in a can of vanilla frosting… dyed pink. He’d share with Mike and that’s where this all started.

Mike isn’t one for pink frosting, so I just use it straight up out of the can. The vanilla frosting takes this fluffy sweet cake to a whole level of yum. The frosting makes him super happy, and I love to make my husband happy.
So here is Mike’s favorite angel food cake recipe. I went to my guru off all things food, Alton Brown, to learn all the best tips and tricks to make it and you will not be disappointed friends!
Why is it called angel food cake?
This cake is named for its light and fluffy texture. Originally called Angel Cake, because the texture is “so light that angels could eat it and still fly without being weighed down.”

Ingredients for Angel Food Cake
- Granulated sugar
- All-purpose flour + cornstarch OR cake flour
- Salt
- Egg whites – preferably at room temperature
- Warm water
- Vanilla extract – almond extract and orange extract are tasty options too
- Cream of tartar
I don’t usually keep cake flour in my pantry. It’s one of those things I never use up before it expires. Cake flour will do amazing things for this recipe. I made it properly once before.
That being said, the all-purpose flour and cornstarch substitution is my go-to because I always have them on hand. It’s a negligible difference for us.
I’ve noted the ingredient amounts for each flour option in the recipe card below.

How to Make Angel Food Cake
I use a stand mixer for this recipe because it’s so darn efficient. You can absolutely use a hand mixer with a whisk attachment or a balloon whisk with a large bowl works to make this cake too.
Just know that you need soft peaks before adding the sugar to the egg whites, and medium peaks when you finish. Whisking times may vary based on your whisking method.
- Start off by preheating your oven to 350 degrees F.
- After that, add half of the sugar, all the flour, cornstarch, and salt to a medium mixing bowl and whisk them together. Set this mixture aside for now.
- To the bowl of your stand mixer, you’re going to add all of the egg whites. Make sure there are no yolks! Then add in the warm water, vanilla, and cream of tartar. Set your mixer to high speed and whip the egg white for 2 minutes.
- After two minutes, reduce the mixer speed to medium and slowly sprinkle in the remaining sugar. Once the sugar is incorporated, continue to beat the egg whites until medium peaks have formed. (see image for reference).
- Once you have medium peaks, remove the bowl from your stand mixer and leave the whisk attachment in the sink. Grab a rubber spatula and your flour mixture. Sprinkle about 1/4 of the flour mixture over the egg whites. Then use the spatula to fold in the flour until it’s just about incorporated – just don’t want to over mix.
- Continue to add one-quarter of the flour and then gently folding it in until all the flour has been added. Be sure it’s evenly incorporated into the egg whites. You don’t want any dry ingredient pockets hiding in there.
- After the batter is ready, gently spoon the cake batter into an ungreased tube pan. Once all the batter is in your pan, use the spatula or the back of a spoon to spread the top out to the edges of the pan. There’s no need to tap the pan to remove air bubbles.
- Now you’re ready to place the cake on the middle rack of your oven and bake it for 35 minutes. DO NOT open the oven for any reason while the cake is baking or it will fall. After baking, check the cake is done by inserting a toothpick halfway between the outer wall and tube of the pan. The toothpick should come out clean.
- Carefully flip the pan upside down and place it over a cutting board (if it’s a footed pan) or a cooling rack (if not footed). Then, let the cake cool completely for 1 to 2 hours.
- Once the cake has cooled, turn it right-side-up and run a knife around the outer edge of the pan. Then use the center tube to life the cake from the outer wall. Using the same knife to separate the cake from the inner tube and the bottom of the pan.
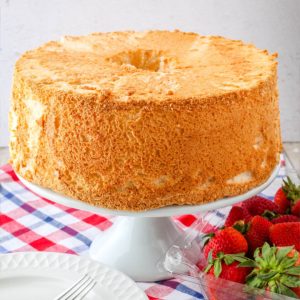
- Now you can either serve the cake upside down as I have or right side up. Totally your choice. If you’re going with upside down, invert the cake onto a platter or cake stand right from the pan. If you want to serve it right side up, invert the cake to a cooling rack and then flip over onto your serving plate.
I like my angel food cake with whipped cream and strawberries, but for Mike, it’s all about that frosting. Garnish your cake however you like. Maybe even a little homemade lemon curd made from all those leftover egg yolks.

How to cool angel food cake?
You need to cool this cake upside down. Otherwise, it’ll squish itself down as the cake cools. Then you’ll have this weird, oddly dense cake and no one wants that.
This cake is made in a footed tube pan (or non-footed angel food cake pan, but they’re the same price). The base and center are connected so you can release the cake from the pan sides. Then you can easily cut it away from the base before flipping.
The feet on the pan let you turn the cake upside down while leaving space underneath it for cooling. You could also use a non-footed pan and put it upside down on a cooling rack. There might be some rack indents on the cake, but who cares? It’ll be the bottom of the cake once you flip it onto the platter anyway, right?!

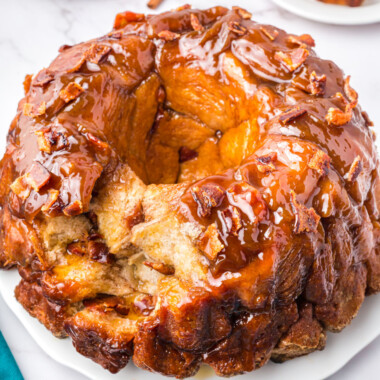
Can I make angel food cake in a bundt pan?
You can. It’ll work out fine. Your cake just won’t have that traditional look.
I get it. A whole pan just for one type of cake takes up pantry space and may seem like a silly purchase.
But I’ve used this pan SO many times over the years. A footed tube pan is worth the $17 investment. I do skip over the angel food cake breaker though. A serrated knife works, just fine.
The prep for this cake takes a little TLC, but I think this homemade cake comes out a million times better than a store-bought angel food cake. Or those angel food cake mix boxes.

Can you freeze angel food cake?
Yes! Slice a completely cooled cake into pieces. (no frosting, no toppings) Then wrap each slice twice with plastic wrap or foil. Pop the wrapped slices into freezer Ziploc bags and squeeze out the air.
The slices will keep for 4-6 months. Then defrost in the fridge for a few hours before eating.
Is it healthy to eat angel food cake?
I wouldn’t say this cake is healthy, but it is definitely lower on the calories and fat than your standard cake. A slice of this angel food cake has only 205 calories and 1 gram of fat – if you cut the cake into 10 slices. These numbers vary depending on the size of your slice.
If you add frosting (like Mike does) or whipped cream and strawberries, that’ll change things up too. But if you need a sweet tooth fix a plain, good-sized slice of this cake won’t derail your diet too much.

Need more cake in your life? Of course, you do!
- Old-Fashioned Applesauce Oatmeal Cake
- Lemon Raspberry Cake
- The Best Chocolate Pudding Cupcakes
- Rom-Soaked Honey Pound Cake
- Pink Asti Cupcakes
- More dessert recipes

Angel Food Cake
Ingredients
- 1 ¾ cups granulated sugar divided
- 1 cup all-purpose flour minus 1 tablespoon
- 1 tablespoon cornstarch
- ¼ teaspoon salt
- 12 egg whites room temperature if possible
- ⅓ cup warm water
- 1 teaspoon vanilla extract
- 1 ½ teaspoons cream of tartar
- Whipped cream
- Strawberries chopped
- 1 can vanilla frosting optional
Instructions
- Preheat oven to 350 degrees F.
- In a medium mixing bowl, combine 3/4 cup + 2 tablespoons sugar, flour, cornstarch, and salt together. Set aside.
- Using a stand mixer (or hand mixer with a large bowl), beat the egg whites, water, vanilla, and cream of tartar on high speed.
- After 2 minutes, reduce speed to medium and slowly add the remaining 3/4 cup + 2 tablespoons sugar to the egg whites while the mixer beats continuously. Once you have achieved medium peaks turn off the mixer.
- Sprinkle enough of the flour mixture to dust the top of the egg whites. Use a rubber spatula to gently fold in the flour mixture until it's almost fully incorporated.
- Repeat until flour mixture is folded into egg whites. You'll need to work in 3 to 4 batches while mixing in the flour in as few folds as possible.
- Gently spoon the cake batter into an ungreased tube pan. Do not tap the tap on your counter to settle it. You want all the air you beat into the egg whites. Use the back of a spoon to gently spread the cake batter to the edges of the pan and create an even surface.
- Bake for 35 minutes. DO NOT open the oven at any point while the cake is still baking! Check that the cake is done by inserting a wooden skewer into the cake halfway between the middle tube and the outer wall. If it comes out clean your cake is ready.
- Cool cake upside down in tube pan for at least an hour. Cooling it upside down keeps the cake from squishing itself as it rests.
- Once the cake has cooled, run a knife around the outer wall of the pan to release the cake. Use the tube to pull the cake from the outer pan. Then run your knife around the center tube and under the cake to finish releasing it.
- Turn the cake upside down onto a cake plate or serving platter. Cut into 10 slices and garnish with whipped cream and strawberries if desired.
- Optional: Coat the angel food cake with a can of vanilla frosting. Make ALL the frosting fit... by any means necessary.
Notes
Nutrition
All nutritional information is based on third party calculations and is only an estimate. Each recipe and nutritional value will vary depending on the brands you use, measuring methods and portion sizes per household.


Barb says
Sounds great going to try tomorrow. I have so many eggs and need to use them.